Get dirty – get to know your soil
'We know more about the movement of the celestial bodies than about the soil underfoot.'
Leonardo da Vinci (1452–1519), 'Universal Genius' of Renaissance times.
Simple exercises to characterise your soil
You don’t have to be a soil scientist to get to know some of the essential characteristics of your own backyard soil. Anyone can get their hands dirty.
With a few simple tests you can find out some interesting facts about your own soil. All you need is a spade or garden trowel, a jar with a lid, some water, and either a soil colour smartphone app or soil colour sheets.
Like a good chocolate cake, a good soil needs the right structure, texture and colour.
Structure refers to how the soil is holding itself together. Imagine a chocolate cake that is very dense. There are no air bubbles, and as you bite into it you need to chew hard. The opposite would be a very crumbly, light cake with a lot of air bubbles, and it is hard to even stick your fork into it because it crumbles away.
A good soil structure sits in the middle: there are air bubbles ("pore space"), but the soil also sticks together in blocks ("peds") of various sizes when you squeeze it with your fingers.
You can use a fun test to look at soil structure:
- Dig out a 20 cm cube of soil with a spade.
- Then drop the block of soil onto a hard board in a plastic tub from 1 meter height, which is approximately from your navel – or your parent’s navel if you are still growing.
- Drop the block of soil three times (and remember, drop, don’t throw!), and gently crumble the biggest remaining blocks of soil, but only as much as they crumble without much force.
- Now you can separate the blocks and crumbs from large to small, with a little patience.
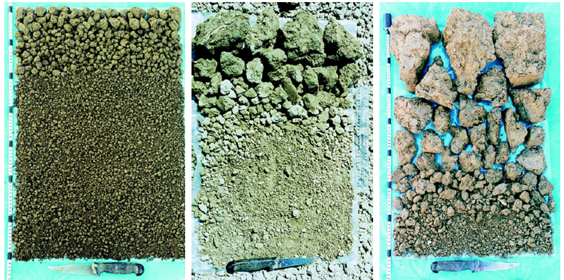
Visual assessment of soil structure. Good condition (left), moderate condition (middle), and poor condition (right). Source: MWLR
While doing this you will notice some characteristics of the soil structure: If the soil falls into small crumbs and dust, there is not much structure. If the blocks remain large and hard and dense, this is also not a good structure. Imagine how roots would have to grow through such hard soil. A good soil structure gives a mix of soil crumbs and blocks, called aggregates or peds, and enough space for air and water to enter and move through the soil. Look at the picture above and check how your own soil looks compared to the three examples provided.
Texture is determined by how much sand, silt and clay are in your soil. Sand, silt and clay are the individual grains in soil, and we distinguish them by their size. Sand grains are between 2 mm and 0.06 mm, silt between 0.06 and 0.002 mm, and clay is smaller than 0.002 mm (2 µm). This is impossible to see, but we use the 'jam jar test' or our fingers to estimate soil texture.
If you have some time and don’t mind waiting a bit you can do the jam jar test. These are the steps to perform the test.
Collect a soil sample
Dig down a few centimeters so you get below the topsoil. Spread the soil out and remove any pebbles and as much of the bits of roots and remaining fluffy organic matter as you can. Also crush the lumps of soil. These lumps are actually soil aggregates – a good thing in your soil but they need to be broken down to learn about your soil texture.
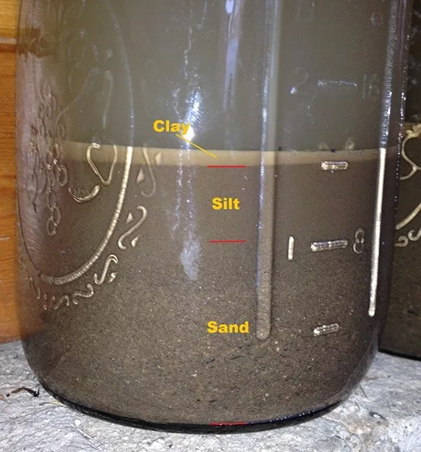
An example of a mason jar soil test. Source: permacultureflora.com
Take a clean jam or mason jar and fill it to one-third with your soil
Then add clean water to about two-thirds of the jar, plus a teaspoon of dishwashing liquid or dishwasher powder. Screw on the lid and shake well, and then let it stand for 24 to 48 hours. You will see different layers appearing because the different sizes of the grains settle at different speeds. The sand settles first, forming a layer on the bottom of the jar. Afterwards, silt-sized particles – if present – will accumulate on top of the sand. Clay particles take a long time to settle in water due to their small size, so they will settle last. You may also see organic matter floating on the surface of the water.
Use the differences in structure and colour to differentiate the sedimented layers
On the bottom - where particles can clearly be seen - it is sand. The silt above it still has a bit of texture, and the clay on top will appear very dense. Using a ruler, measure the different layers (the clay layer may be difficult to see, and very small). You can estimate or calculate the percentage of each sand, silt and clay layer, and use a texture triangle to work out your soil texture:
Height of sand layer:_______cm
Height of silt layer:_______cm
Height of clay layer:_______cm
Total height of all layers together:_______cm
% SAND = (sand height)/(total height) x 100 =_______ % SAND
% SILT= (silt height)/(total height) x 100 =________ % SILT
% CLAY= (clay height)/(total height) x 100 =________ % CLAY
Now use the texture triangle below to determine the texture class of your soil

'Texture triangle' diagram used to determine soil texture classes
Track the lines with the percentages measured and find the spot on the triangle where all three lines intersect. The region where these lines intersect indicates the soil texture. The example shown represents a silt loam texture of 25% clay, 45% silt and 30% sand.
How to read the texture diagram
The clay percentages are on the right side of the triangle. Lines corresponding to clay percentages extend from right to left (see red line). The sand percentage is on the left side, with lines extending downward diagonally left to right (see blue line). The silt percentage is on the bottom, with lines extending upward, diagonally left to right (see green line).
If you are a bit impatient and like to get your hands seriously dirty, take about a tablespoon of soil in your hand and slowly wet it with some water until you can knead it but it isn’t completely soaked. Then follow the texture flow chart below.
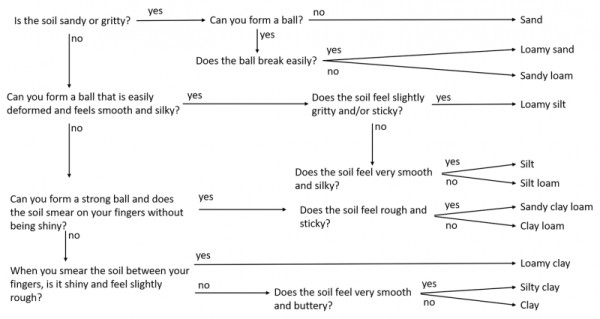
Flowchart for soil texture determination by hand
Colour is another important thing to look at in your soil. A nice, dark, chocolaty colour is a sign of humus in your soil, and this is food for bugs that help make nutrients available to your plants. But soils have many different colours and there is no good or bad, just some hints as to how much organic matter may be in your soil.
Soil scientists use official colour charts (the Munsell colour system) to name and describe soil colours. This way soils can be compared all over the world using the same colour names and codes. These official colour charts are quite expensive, so for your own garden soil you may want to use the chart pictured below that was developed to represent most New Zealand soil colours, or you could use a colour identification app on your mobile phone.
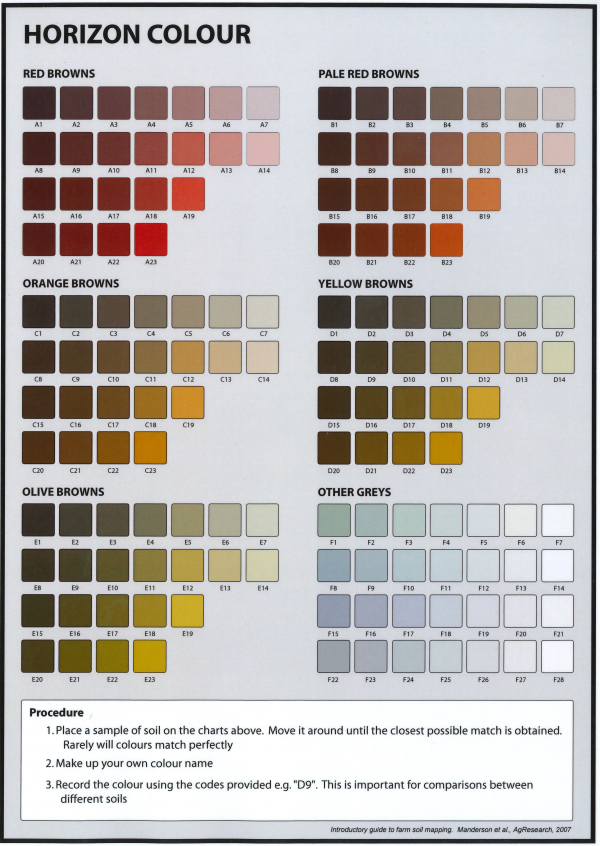
Example of a soil colour chart
Take a little bit of soil, make sure it’s moist, and compare it to the colour chart to find the colour that best matches the soil colour. Do this with the sun shining on both the chart and the soil. Don’t worry if it doesn’t match perfectly. Write down the name and code.
If you are using an app, take a moist soil sample and hold it in the sun while pointing your phone’s camera at the soil sample and note the colour name and code.
Field guides to help you determine a whole range of essential soil characteristics.
NZ VSA Field Guides
